Dabao's Tech Blog
Archives
Label
About
GitHub
Facebook

[ Linux ] CentOS 安裝 epel 與可能出現的錯誤

logo

因為案子還沒開始,今天幫忙接手了同事做到一半的server,在 yum install 時報錯,於是有了這篇文章 ...

Linux - CentOS

epel是一個擴充資源庫,擴充了安裝指令yum可安裝的項目

直接安裝epel-release

sudo yum install epel-release

如果輸入上面的指令報錯的話,就需要自己去抓來源 ↓

#查詢你的Centos版本
cat /etc/redhat-release

#CentOS and Red Hat Enterprise Linux 5.x
wget http://dl.fedoraproject.org/pub/epel/5/x86_64/epel-release-5-4.noarch.rpm
sudo rpm -Uvh epel-release-5*.rpm

#CentOS and Red Hat Enterprise Linux 6.x
wget http://dl.fedoraproject.org/pub/epel/6/x86_64/epel-release-6-8.noarch.rpm
sudo rpm -Uvh epel-release-6*.rpm

#CentOS and Red Hat Enterprise Linux 7.x
wget http://dl.fedoraproject.org/pub/epel/7/x86_64/e/epel-release-7-5.noarch.rpm
sudo rpm -Uvh epel-release-7*.rpm

#確認是否安裝完成
ls -1 /etc/yum.repos.d/epel* /etc/yum.repos.d/remi.repo

這時候我們應該會看到 ↓,共 3 個檔案

/etc/yum.repos.d/epel.repo
/etc/yum.repos.d/epel-testing.repo
/etc/yum.repos.d/remi.repo

#編輯 remi.repo
vim /etc/yum.repos.d/remi.repo

[remi]
name=Les RPM de remi pour Enterprise Linux 6 - $basearch
#baseurl=http://rpms.famillecollet.com/enterprise/6/remi/$basearch/
mirrorlist=http://rpms.famillecollet.com/enterprise/6/remi/mirror
#這行 ↓
enabled=0
#改為 ↓
enabled=1
gpgcheck=1
gpgkey=file:///etc/pki/rpm-gpg/RPM-GPG-KEY-remi

到這邊就算是安裝完成,但是也許會有人在安裝時遇到以下錯誤 ( 我在別台機器遇到惹XD )

Error: Cannot retrieve metalink for repository: epel. Please verify its path and try again

這時候就需要再次修改remi.repo

#編輯 remi.repo
vim /etc/yum.repos.d/remi.repo

[remi]
name=Les RPM de remi pour Enterprise Linux 6 - $basearch
#這行 ↓
baseurl=http://rpms.famillecollet.com/enterprise/6/remi/$basearch/
#跟這行 ↓
#mirrorlist=http://rpms.famillecollet.com/enterprise/6/remi/mirror
enabled=1
gpgcheck=1
gpgkey=file:///etc/pki/rpm-gpg/RPM-GPG-KEY-remi

這樣就可以正常安裝了 !

more

[ Linux ] 記憶體不足,啟用 Swap Memory

logo

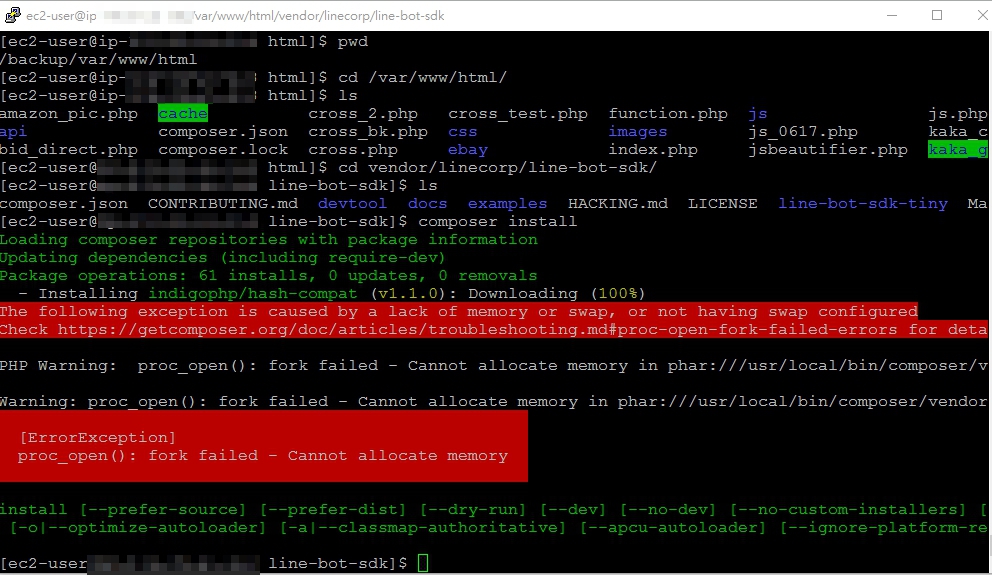
最近在研究 LINE-robot ,因為需要 PHP 管理套件 Composser 協助安裝,在執行時遇到了記憶體不足的錯誤,就順便記錄下來

Linux

AWS-EC2

placeholder

Error message ↓

[ErrorException] proc_open(): fork failed – Cannot allocate memory

# 先確認可用空間
df -h
cd /(可用的空間)
# 再把部分的可用空間改為虛擬記憶體,製造 1G 的 Swap Memory
fallocate -l 1G swapfile
# 修改 Swap Memory file 的權限
chmod 600 swapfile
mkswap swapfile
# 啟動
swapon swapfile
# 反啟動
swapoff swapfile

結論:Composser 屁股好大

參考:https://www.phpini.com/linux/linux-add-swap

more

[ Git ] git & github 建置

logo

以往遇到問題都沒有好好記錄的習慣,所以最近開了這個BLOG,就是想把遇到的問題或是方法記錄下來。所幸有 github 這麼方便的地方可供紀錄。

Linux

Step 1 - Create SSH key

要用 git 就不得不提 SSH key,要在 Linux 上產生 SSH key,可以使用ssh-keyge這個指令。

在建立金鑰之前,請先建立~/.ssh這個目錄,並設定正確的權限:

以下為指令紀錄 ( Command line below ) :

#在家目錄建立 .ssh folder
mkdir -p ~/.ssh
chmod 700 ~/.ssh
cd ~/.ssh

在產生金鑰的過程中,會詢問一些問題,對於一般的使用者而言全部都使用預設值(直接按下 Enter 鍵)即可。

#建一個ssh金鑰
ssh-keygen

#指定金鑰檔案名稱,直接 **Enter** 為預設`id_rsa`
Enter file in which to save the key ({PATH}/id_rsa): {Enter}

#如果這邊直接按 Enter,代表不需要密碼或是輸入指定的密碼
Enter passphrase (empty for no passphrase):

#再次輸入密碼或是在按一次**Enter**,就會產生金鑰
Enter same passphrase again:
注意 ! 只要金鑰有密碼,之後每次使用都必須再輸入一次

到了這時,會有兩個檔案產生

  • id_rsa.pub:公開金鑰-public key,提供給對方、server、github 遠端認證使用。
  • id_rsa :私人金鑰-private key,與公鑰相呼應,等同於密碼,不對外提供。

Step 2 - Enter the key to the github

註冊好 github 的帳號,到 Account Setting 中有個 SSH keys 的標籤中

選擇 New SSH keysid_rsa.pub 的內容貼到 key 的框框內即可

※、bitbucket 上也是相同的做法呦~

Step 3 - Clone your repository

Clone github public 的 repository 不需要權限,但若是要 Clone private 的 repository 就需要 key 的驗證

git clone httsp://github.com/xxxxx/xxxx.git

再隨便改點小東西,試著推送看看是否可以寫入

我就有遇到一個小問題,系統出現 ↓

error: The requested URL returned error: 403 while accessing https://dabahuang@github.com/ ….

後來我查了一下,在 stackoverflow 上也有人遇到跟我一樣的問題

原來 Github 只支援ssh的讀寫,雖然https也回傳可讀寫卻不支援 XD

這時侯只要編輯 同repository 目錄底下的 .git/config 就可以囉 ↓

[core]
        repositoryformatversion = 0
        filemode = true
        bare = false
        logallrefupdates = true
[remote "origin"]
        fetch = +refs/heads/*:refs/remotes/origin/*
        # ↓ 就是這段出錯
        url = https://github.com/DabaoHuang/dabaohuang.github.io.git
        # ↓ 改為這樣即可
        url = ssh://git@github.com/DabaoHuang/dabaohuang.github.io.git
[branch "master"]
        remote = origin
        merge = refs/heads/master

:wq

#這樣就可以正常的 push 啦 !
git add .
git commit -m "Ya!"
git push -u origin master

Windows

窗戶的使用者建置git非常方便,只要安裝好 git ,因為過程非常簡單,滑鼠左鍵加右鍵就能解決一切安裝與設定,頂多加上Ctrl+C複製 github 的 SSL 連結,就不多做說明了 !

2018-01-03 補充:

今天創建了一個 Repository,但是跟上面的最終目的不太一樣,是要將 原本有資料的 Repository 丟上去,當然前提是你已經在 github 創建好一個 空的 Repository

# 到想要上傳的目錄
cd /your/repo

# 當然,本地也要建成一個 Repository,如果還沒作一定要先 git init,如果已經做過了可以跳過這個步驟
git init

# 因為預設通常是 origin,如果已經有別人先建置過一遍的話需要先確認一下有沒有人把 origin 用掉
cat .git/config

### 如果有用過的話會長的像是這樣
[remote "origin"]
        url = git@github.org:xxxxxxx/xxx.git
        fetch = +refs/heads/*:refs/remotes/origin/*
###

# 或是用
git remote -v
origin  https://github.com/OWNER/REPOSITORY.git (fetch)
origin  https://github.com/OWNER/REPOSITORY.git (push)
destination  https://github.com/FORKER/REPOSITORY.git (fetch)
destination  https://github.com/FORKER/REPOSITORY.git (push)

# 如果有重複的分支就刪除
git remote rm destination

# 確認後即可同步,如果Origin 被佔用了可以換成其他熟悉好記的字詞

git remote add origin git@github.org:xxxxxxx/xxx.git
git add .
git commit -m "commit as `/bin/date +%G/%m/%d/%H/%M/%S"
git push origin master

參考

  • (GitHub.Help)[https://help.github.com/articles/removing-a-remote/]s
more