[ INFRA ] A10 ax1000 Load banlcaner 設定參考
22 Jan 2018

為什麼要做負載平衡 ?
當你的流量過高,一台伺服器已不堪使用,需要兄弟姊妹幫忙時,負載平衡就是那個分配工作的管家。而在 end-user 眼中,看起來都像是同一台 server 在運作。
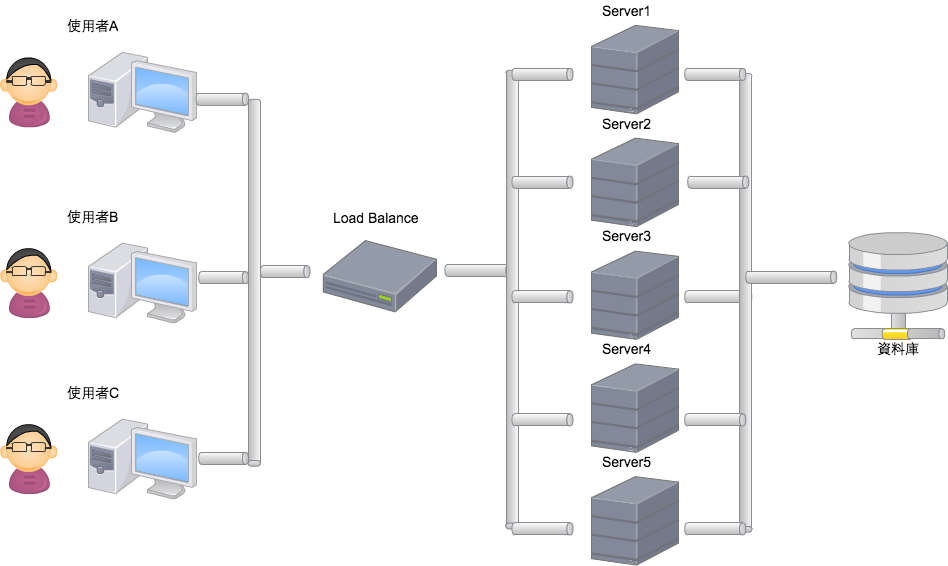
負載平衡 (Load balance) 示意架構如下:

- User A to C : 一般 user 透過 Browser 連線
- Load balance : A10 ax1000
- Server 1 to 5 : WEB server
Step 1 - 連線與基本設定
ax1000 可以透過 MGMT 用一般的乙太平行線對連,這步驟建議先用筆電在機器旁邊操作。
用 Putty@ssh 即可連進 Console 畫面
ax1000 預設的 ip 為 172.31.31.31,連進去前請不要忘記把你電腦的網卡也設定成同網段 !
- Admin User : admin
- Password : a10
連線成功後出現以下訊息↓
login as: admin
Using keyboard-interactive authentication.
Password:
Last login: Mon Jan 22 12:21:05 2018 from 192.168.1.91

AX system is ready now.

[type ? for help]

AX1000>

# 進階設定模式 - 剛買回來的機器預設無密碼
AX1000> enable
Password:
AX1000#

# 管理者設定模式
AX1000# config
AX1000(config)#

# 更改主機名稱
AX1000(config)# hostname dabao-ax1000
dabao-ax1000(config)#

# 設定時區
dabao-ax1000(config)# clock timezone Asia/Taipei
dabao-ax1000(config)# show clock
*14:54:15 CST Mon Jan 22 2018
Step 2 - Cut Vlan
Vlan : 虛擬區域網路,總而言之就是劃分、隔離不同的網路,需要知道詳細的話,wiki有解答~
#####Vlan 10######
# 建立一個ID為 10 的 Vlan 群組
dabao-ax1000(config)# vlan 10
# 劃分 port 1 to port 2 到 Vlan 10 底下
# untagged 意思是不與其他 vlan 共用這些 port,完全獨立
# 反之 tagged 就是開放共用,適用在跨設備的情況下
dabao-ax1000(config-vlan:10)# untagged ethernet 1 to 2
# 設定連接窗口 (Virtual Interface) 為ve10
dabao-ax1000(config-vlan:10)# router-interface ve 10
# 丟個名稱給它,方便管理
dabao-ax1000(config-vlan:10)# name "Web-Server-Outside"
# 結束,就像Cisco console一樣
dabao-ax1000(config-vlan:10)# end

#####Vlan 20######
# 建立一個ID為 20 的 Vlan 群組
dabao-ax1000(config)# vlan 20
# 劃分 port 3 to port 4 到 Vlan 20 底下
dabao-ax1000(config-vlan:20)# untagged ethernet 3 to 4
# 設定連接窗口 (Virtual Interface) 為ve20
dabao-ax1000(config-vlan:20)# router-interface ve 20
# 一樣丟個名稱給它,方便管理
dabao-ax1000(config-vlan:20)# name "Web-Server-Inside"
# 結束
dabao-ax1000(config-vlan:20)# end

# 預設的情況下 port 1 to 8 都是 disabled 的,需要啟動
# 依照以下指令把 1 to 4 打開
dabao-ax1000(config)# interface ethernet 1
dabao-ax1000(config-if:ehternet1)# enable
dabao-ax1000(config-if:ehternet1)# interface ethernet 2
dabao-ax1000(config-if:ehternet2)# enable
...

dabao-ax1000(config-if:ehternet4)# end

# 我們雖然剛剛指定了 Vlan 10 窗口為 Ve10,但是 Ve10 需要設定才能使用
# Ve10 (對外網路)
dabao-ax1000(config)# interface ve 10
# 設定IP與子網路遮罩
dabao-ax1000(config-if:ve10)# ip address 211.78.92.xx 255.255.255.0
# 啟用網路位址交換-NAT 處理
dabao-ax1000(config-if:ve10)# ip nat outside
dabao-ax1000(config-if:ve10)# end

# Ve20 (內網) 要做 Load Banlance 的 Server 放在這裡面~
dabao-ax1000(config)# interface ve 20
# 設定IP與子網路遮罩
dabao-ax1000(config-if:ve20)# ip address 192.168.1.1 255.255.255.0
# 一樣啟用NAT處理
dabao-ax1000(config-if:ve20)# ip nat inside
dabao-ax1000(config-if:ve20)# end
到這邊,初步的設定算是做完了,接下來就是重頭戲 - 負載平衡
Step 3 - Load-balance
開始設定要做 load balance的群組,雖然圖片上有五台SERVER,但是目前我示範的是兩台的設定唷~
# 第一台,請與該Server網卡上的ip一致
dabao-ax1000(config)# slb server Web1 192.168.1.11
# 開放 http 埠
dabao-ax1000(config-real server)# port 80 tcp
# 離開後設定第二台
dabao-ax1000(config-real server-node port)# exit
dabao-ax1000(config-real server)# exit
# 第二台,請與該Server網卡上的ip一致
dabao-ax1000(config)# slb server Web2 192.168.1.12
# 開放 http 埠
dabao-ax1000(config-real server)# port 80 tcp
# 離開
dabao-ax1000(config-real server-node port)# exit
dabao-ax1000(config-real server)# exit

# 查看是否正常,正常來說 status 都是 up,如果是down 有可能是你的防火牆沒開這個port
dabao-ax1000# show slb server

dabao-ax1000#show slb server
Total Number of Services configured: 2
                   Current = Current Connections, Total = Total Connections
                   Fwd-pkt = Forward packets, Rev-pkt = Reverse packets
Service                   Current    Total      Fwd-pkt    Rev-pkt    Peak-conn  State
---------------------------------------------------------------------------------------
Web1:80/tcp             0          97         26958      101801     0          Up
Web1: Total             0          97         26958      101801     0          Up

Web2:80/tcp             0          49         8380       31482      0          Up
Web2: Total             0          49         8380       31482      0          Up


# 確認完 slb server 運作都up後,要將他們做成一個 group 給Load balance 使用
dabao-ax1000(config)# slb service-group Webtcp
dabao-ax1000(config-slbsvc group)# member Web1:80
dabao-ax1000(config-slbsvc group)# member Web2:80
dabao-ax1000(config-slbsvc group)# end

# 確認群組運作狀態
dabao-ax1000(config)# show slb service-group

Total Number of Service Groups configured: 1
                   Current = Current Connections, Total = Total Connections
                   Fwd-p = Forward packets, Rev-p = Reverse packets
                   Peak-c = Peak connections
Service Group Name
Service                         Current Total      Fwd-p     Rev-p     Peak-c
-------------------------------------------------------------------------------
*Webtcp               State: All Up
Web1:80                       0          97         26958     101801    0
Web2:80                       0          49         8380      31482     0

# 到這邊就剩下最後一步,建一個虛擬server 也就是架構圖圖中的 load balance的 位置

# 211.78.92.5 為這個虛擬server 對外ip 位址
dabao-ax1000(config)# slbvirtual-server VIP-WEB 211.78.92.5
# 一樣要指定開放的port,這邊為http
dabao-ax1000(config-slbvserver)# port 80 http
# 指定這台虛擬server對應的群組
dabao-ax1000(config-slbvserver-vport)# service-group Webtcp
# 離開
dabao-ax1000(config-slbvserver-vport)# end
# 查看虛擬server 運作狀態
dabao-ax1000(config-slbvserver-vport)# show slb virtual-server

Total Number of Virtual Services configured: 1
Virtual Server Name      IP              Current    Total      Request  Response Peak
Service-Group            Service         connection connection packets  packets  connection
----------------------------------------------------------------------------------------
*VIP-WEB(A)                   192.168.1.161   All Up

    port 80  http                        0          184        35741    133283   0
Webtcp                   80/http         0          146        35338    133283   0
Total received conn attempts on this port: 184
到這邊就大工告成啦 ! (累
2018-01-25 補充:
測試 連上建起的 Virtual server VIP-WEB 211.78.82.5
兩台開iftop之類的監控軟體看目前是連到哪一台,然後把連上的那台網路線拔掉,看看連線是不是有分配到第二台,都正常就是成功了~
2018-03-25 補充:
還原/回復原廠設定的方法
- 利用console Port登入設備
- 用User
reset登入
    login: reset
    password:  # A10設備上的serial-number
    Do you want to reset admin password to default?[y/n]: y
    Do you want to reset enable password to default?[y/n]: y
    Do you want to erase startup config?[y/n]: y
- 使用預設帳密登入,下
system-reset指令,重置startup-config
    login: admin
    password: a10
    a10> en
    a10# config
    a10(config)# system-reset
    [yes/no]: yes
完成!